PROCEDURES FOR PROJECT STARSHINE (Revised January 15, 2002) |
|
Introduction
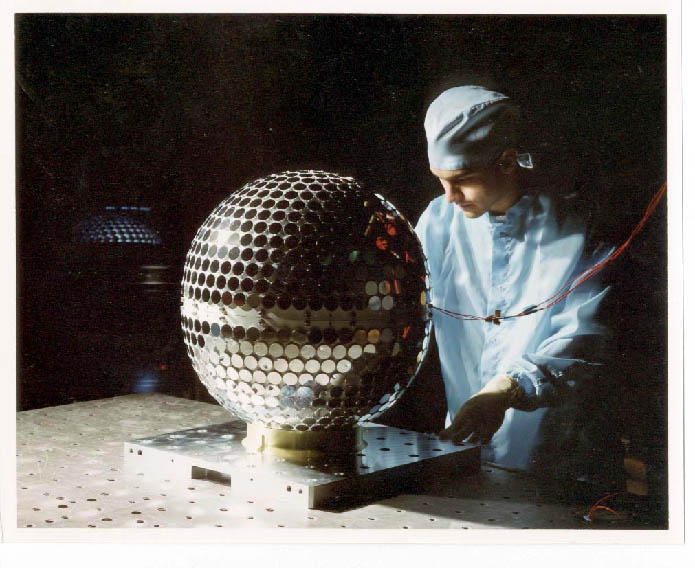
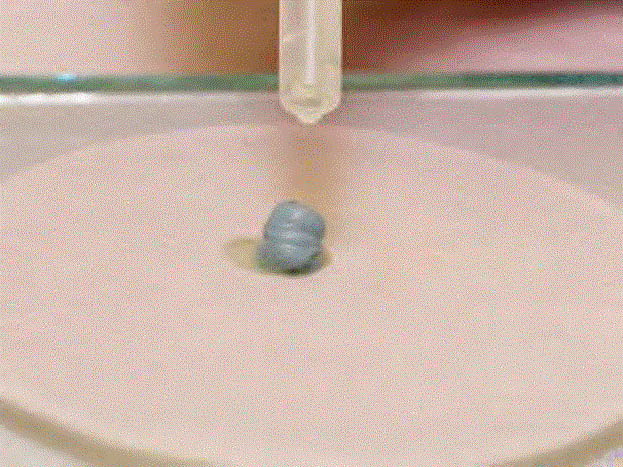
Welcome to Project Starshine, a cooperative, international volunteer student project for measuring variations in density of the earth's upper atmosphere during solar storms. The way we do that is by measuring the orbital decay rates of a series of mirror-covered, optically reflective satellites. You'll be grinding and polishing a mirror for Starshine 4, the latest in a series of our student satellites to be deployed into space during an eleven-year sunspot cycle. Starshine 4 will look very much like this picture of Starshine 1, which started our series off in 1999. NASA will launch Starshine 4 from a Space Shuttle |
|
for us in January of 2003. It will stay in orbit for about 8 months, before being dragged down into the atmosphere's denser regions and burning up. You will be able to help us perform this important space experiment in two ways. First of all, you will be grinding and polishing one of the 1000 student mirrors that will be mounted on the outer surface of this satellite to make it optically reflective. Then, after the satellite has been launched, you can help us measure its orbit. You'll be able to do that by observing sunlight flashes |
|
from its mirrors, as it passes across the starry sky before sunrise and after sunset. Your role in grinding and polishing a Starshine mirror is vital to making the satellite visible. These aluminum mirrors are easy to grind to a very flat shape and to polish to a beautiful finish; however, they are also extremely easy to scratch, if you do not keep everything absolutely clean. So, please follow these instructions as carefully as you possibly can. We're depending on you.
You can view large-scale images of the small photographs that you're now looking at by clicking on each thumbnail to get a full screen version of that image. As the Starshine 4 scheduled launch date gets closer and closer, keep revisiting the Project Starshine home page at http://www.azinet.com/starshine. You can keep up with important program announcements, such as possible schedule changes, in the Updates section. You'll be able to learn more about the overall project under the heading "Project Description". You'll also find out how to track Starshines 2 and 3, that are in orbit now, and Starshine 4, after it is launched, under the heading "A Beginner's Guide on How to Track Starshine." |
|
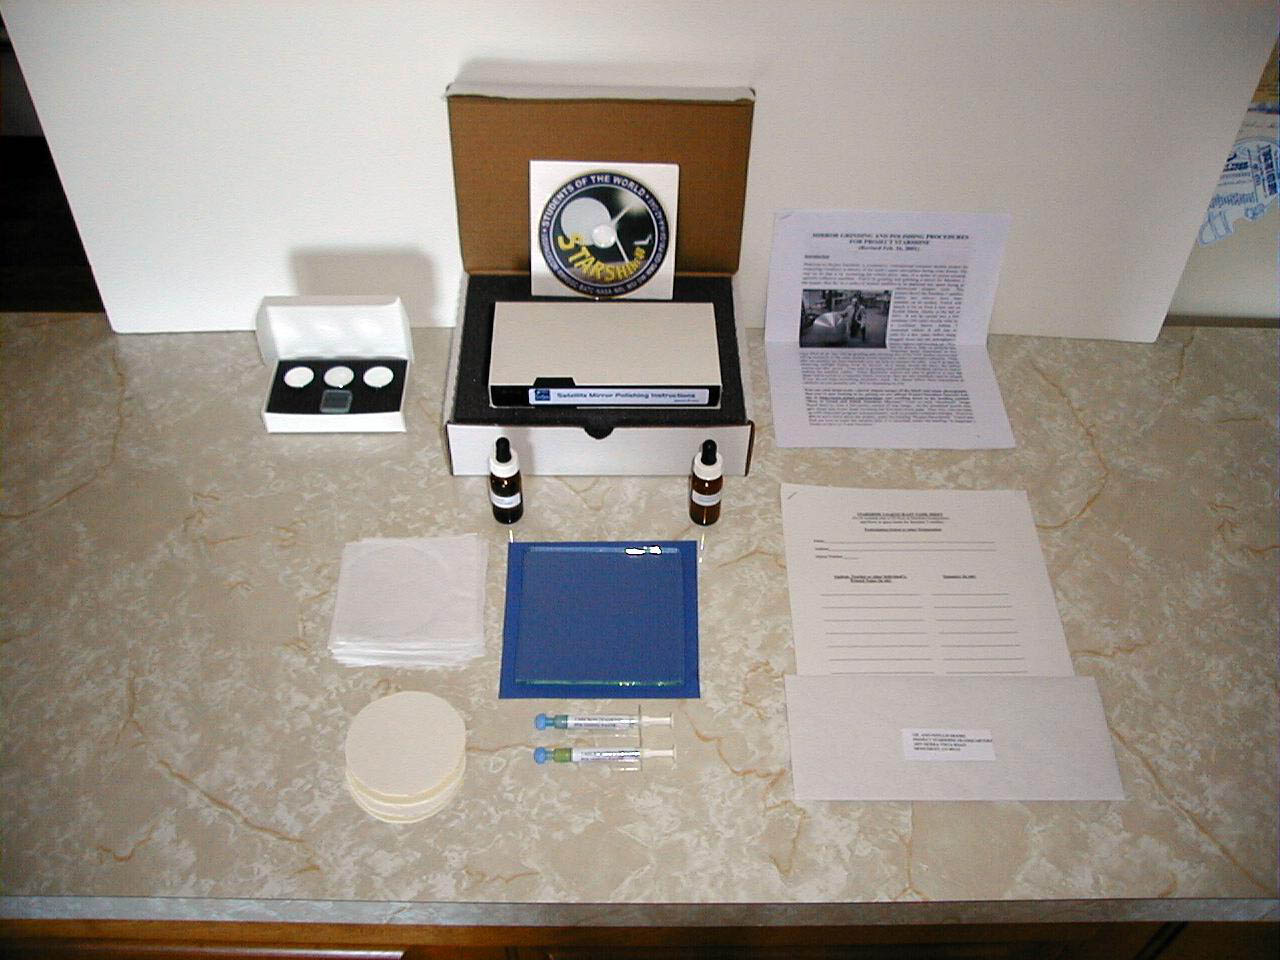
| Now, before you do anything else, completely unpack your Starshine Mirror Grinding and Polishing Kit, carefully sorting through all the foam inserts that hold the components in place. Lay the kit contents out on a table and compare them with the items shown in this photograph. Looking from left to right in the top row, you can first see a small box containing three Starshine aluminum mirror blanks and a glass optical inspection flat. This is the self-addressed box in which you will ship your finished mirrors and inspection flat back to us. Keep it in a safe place. Next to it on the right is the shipping box in which you received your kit. Displayed inside the box is a "dual-platform" CD ROM that is compatible with both MacIntosh and Microsoft-based computers. Recorded on the CD is an instructional movie of the entire grinding and polishing process. Also shown in the box is a videotape of the same process (some of you wanted the CD, while others asked for the videotape). To the right of the box is a copy of the printed instructions that you are now reading. Standing in front of the box are two brown glass dropper bottles. One contains a pink-colored, soupy slurry of 9-micron aluminum oxide particles and water, and the other contains Hyprez polishing lubricant. In the row below the dropper bottles is a stack of twelve lint-free lens tissues, a backing plate made of very flat "float" glass, and a sheet of lined paper which each of your mirror-grinders and polishers should sign. In the bottom row are 4 circular polishing pads, a plastic syringe containing green 3-micron diamond polishing paste, a plastic syringe containing blue 1-micron diamond polishing paste, and, finally, a self-addressed envelope in which to mail your signature page back to Starshine Headquarters in Monument, Colorado, USA. |
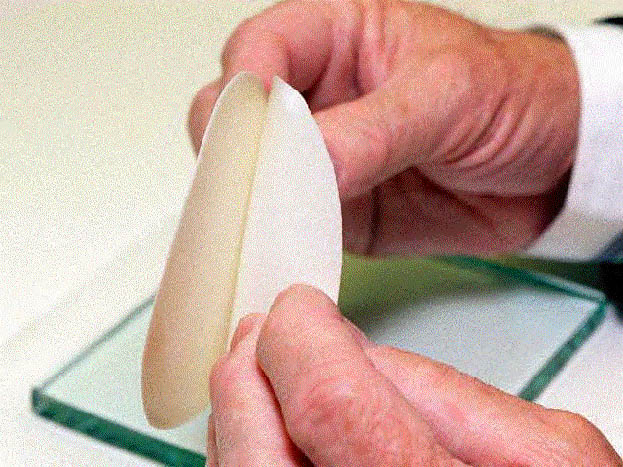
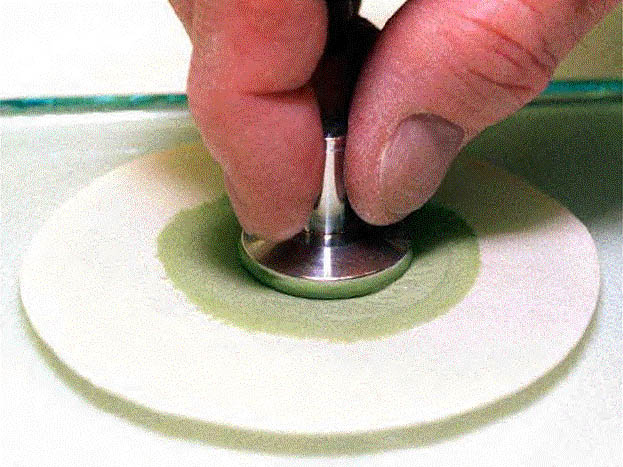
PHASE ONE - MIRROR GRINDING2 Color the flat face of both mirrors with a permanent marker pen or colored grease pencil. The colored metal will show how much of the surface needs to be ground away. (When you have ground all of the color away, and the surface of the mirror is a uniform, dull gray, you will have properly removed the machine tool marks from the face of the mirror.) If you can't find a colored marker, that will be O.K. You can still judge your grinding progress by seeing if there are any shiny places left on the face of the mirror. Pick up the brown dropper bottle labeled "Aluminum Oxide Grinding Slurry." It contains a soupy, pink-colored mixture of very small particles of aluminum oxide powder suspended in water. When thoroughly mixed, this slurry is the consistency of cake batter, paint, or thick soup or cream. Shake the bottle vigorously for about a minute to mix |
|
the water and aluminum oxide well. Squeeze the dropper bulb and release it to pull some grinding slurry up into the dropper. Unscrew the dropper, hold its tip over the center of the glass plate, and squeeze the bulb to release ten drops of slurry onto the plate. Put the dropper back into the bottle and tighten the cap. Pick up one of the mirrors (this will be your #1 Starshine Mirror) and set it face down into the middle of the slurry. Use the mirror to spread the slurry out evenly. Press down on the back of the mirror and grind its flat face against the |
| slurry on the plate, moving the mirror as though you were firmly writing the number "8" with it. Use enough downward pressure to feel the mirror drag on the glass. You will feel and even hear the grinding. Try not to tip or rock the mirror as you move it around in a "figure 8" motion, because that would round off the outside edge of the mirror and make it unusable. Don't hang onto the mirror stem; just press down on the back of the mirror with your fingers and let the stem act as a guide to keep your fingers in place while you |
|
|
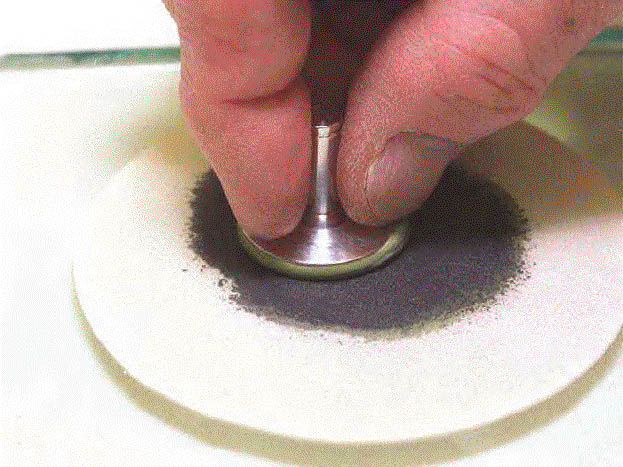
The slurry will turn dark gray as the grinding continues. Add a few more drops of slurry from time to time, if you need to. Let each student spend a minute or so grinding, then pass it on to the next team member.
3 After you've been grinding your mirror for about fifteen minutes, wash the mirror in running tap water until all the grinding slurry is removed. Examine the surface of the |
|
mirror. There should be no marker color or shiny tool marks remaining from the original
machining process. The surface of the mirror should have a uniform dull gray texture. If,
however, there are still some shiny marks or color remaining, repeat step 2 until
they are completely gone. Then wash your #1 Starshine mirror in running tap water, dry
it with a paper towel, and set it aside, tilted stem down and face up, on a clean paper
towel. Wash your hands with soap and water to get rid of the paste and dry them.
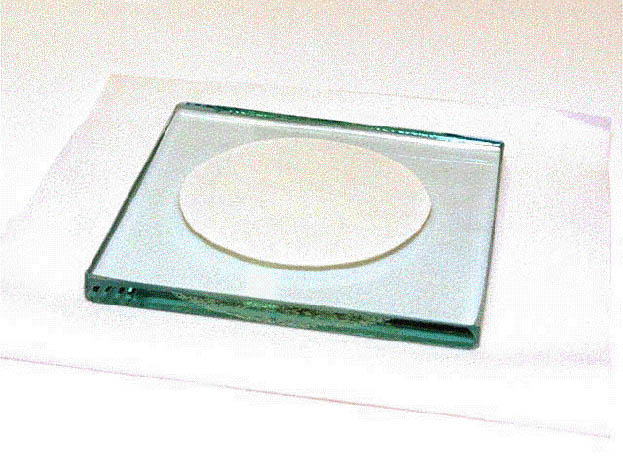
Add a few drops of aluminum oxide slurry to the puddle that you used for mirror #1, and repeat steps 2 and 3 with your second and third Starshine mirrors. After you have finished grinding and examining your second and third mirrors, wash your hands, your aluminum mirrors and the glass backing plate in running tap water. Be especially careful to remove all the slurry that may be sticking to the edges of the mirror or the plate. Then dry the mirrors, the plate and your hands with a clean paper towel. Congratulations!! You have now completed the grinding phase of the overall process. You are ready to move on to the polishing phase, which is much more delicate than the grinding phase and requires special attention to detail and cleanliness to keep your finished mirror from winding up with scratches and dimples on its surface. You will notice that the grinding process has made a dull spot on the glass plate. This is normal, because the process frosts the glass as you grind your three mirrors. However, for the polishing steps that you'll be performing next, you'll need to turn the glass plate over and use the side of the glass that is still shiny.
PHASE TWO - MIRROR POLISHING
|
|
5 Place your glass backing plate, shiny side up, on a clean paper towel on your working surface. Peel the slick backing paper off a circle of Kempad Polishing Cloth . Discard the |
| slick backing paper into a wastebasket. Place the circle of Kempad Polishing Cloth very carefully on the glass plate with its sticky side down. Smooth it down onto the plate with the edge of your hand so there are no wrinkles in it. |
|

|
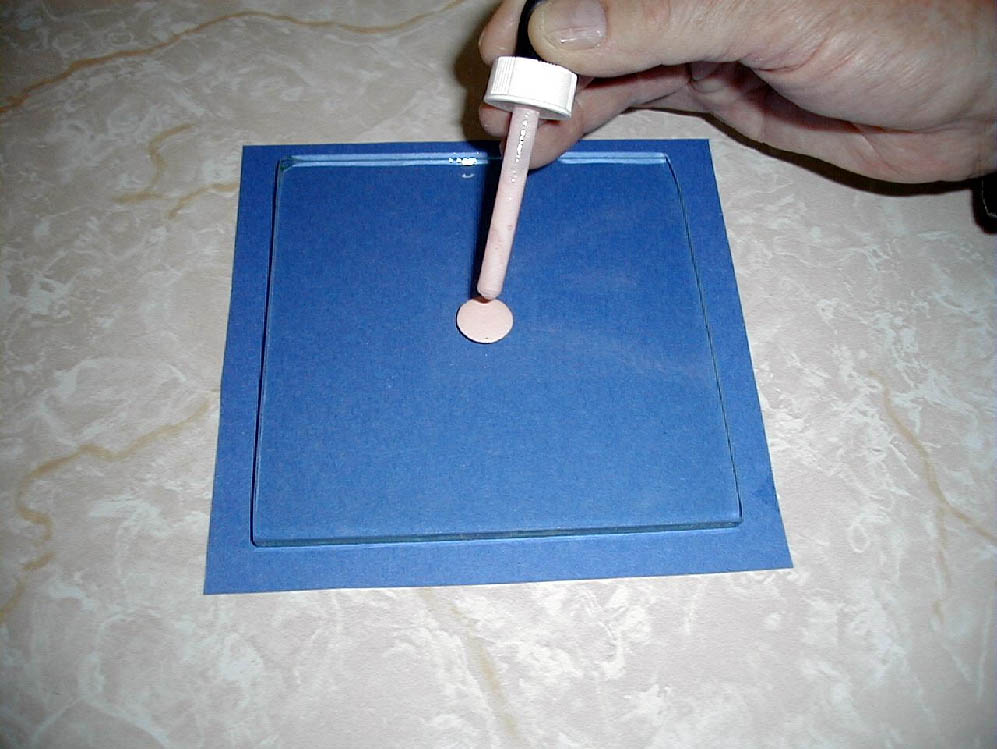
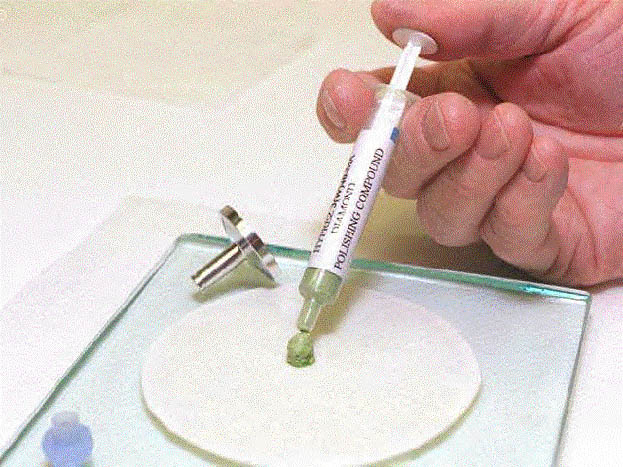
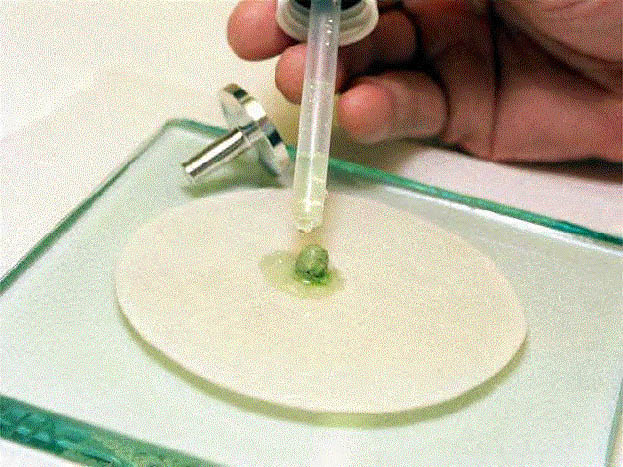
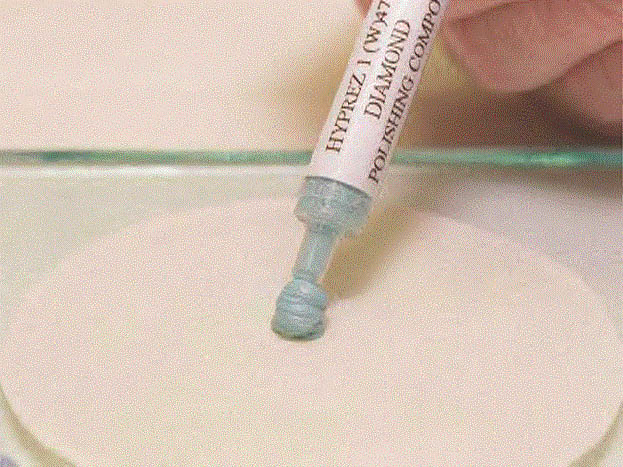
6 Remove the ball-shaped cap from the syringe of green 3 micron diamond polishing paste. Press gently on the plunger of the syringe and squeeze out a green "pea-sized" blob of the compound onto the center of the circle of polishing cloth. Be very careful not to press too hard on the plunger, because you might waste the compound. |
| Put the ball cap back on the syringe and set the syringe down out of the way. Now, unscrew the top of the Hyprez Lubricant bottle and squeeze and release the rubber bulb to suck up some lubricant from the bottle. Take the dropper out of the bottle, |
|
|
squeeze the bulb gently, and drip eight drops of the lubricant onto the blob of diamond paste. Be careful not to let the tip of the dropper touch the blob of paste. That would contaminate the dropper for use in the final polishing step and cause bad scratches in your finished mirror. Put the dropper back into the bottle and screw the cap on. Set the bottle down out of the way.
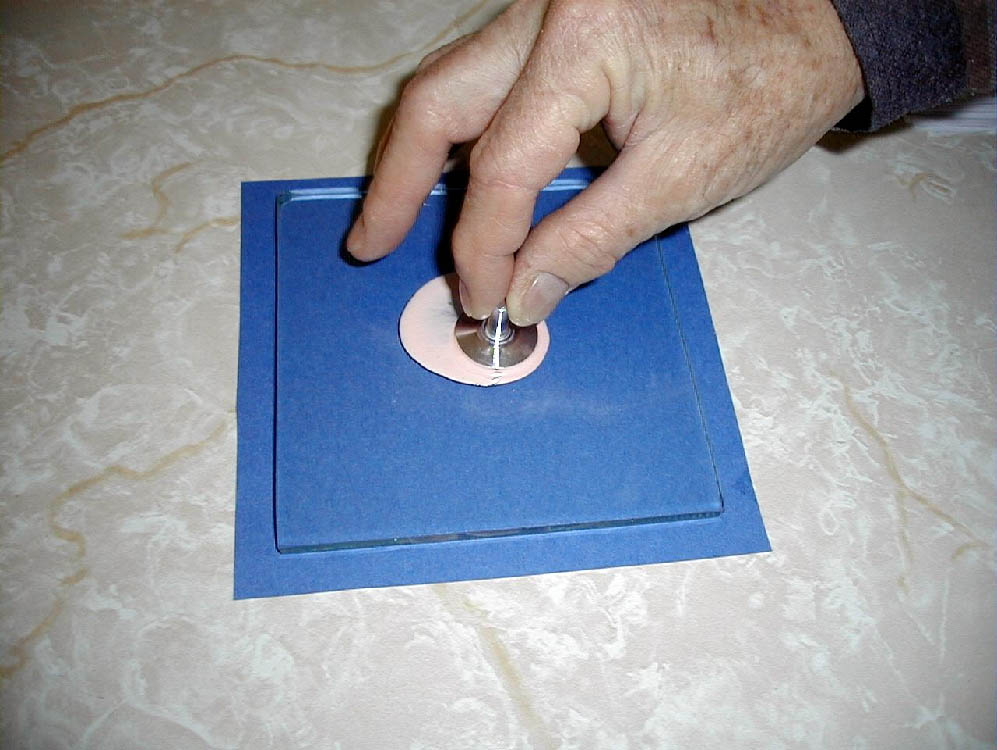
7 Pick up your clean and dry #1 Starshine mirror and set it face down on the blob of lubricated |
| diamond paste in the center of the circle of polishing cloth. It is very important not to let any water get into the diamond paste. Be sure your mirror is dry before you set it on the paste. Polish the mirror against the lubricated paste on the polishing cloth for about fifteen minutes, using a "figure eight" pattern and applying a light downward force. From time to time, use the edge of the mirror to work the lubricated diamond paste back to the center of the |
|
|
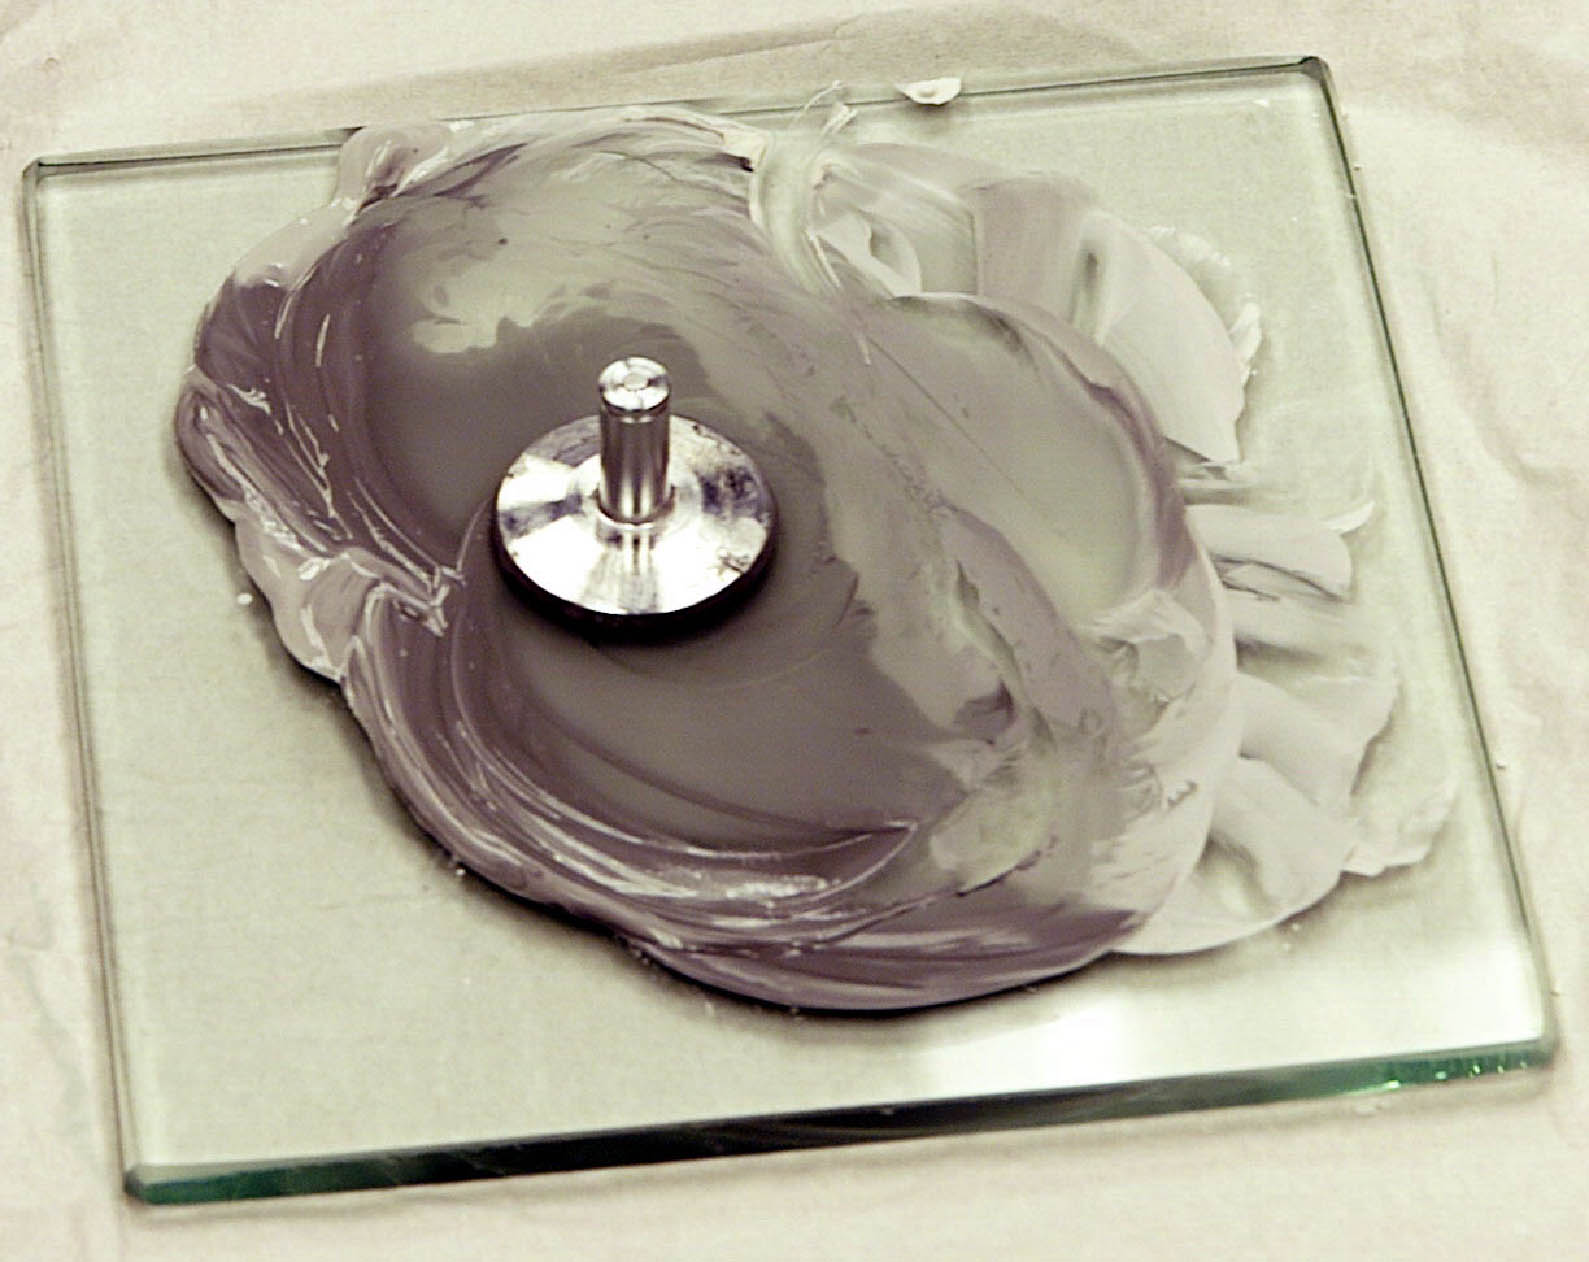
polishing cloth. The paste will turn dark gray and then black from embedded aluminum dust as the polishing process goes on. The diamond compound does not get used up in the polishing process; it just dries out as the Hyprez lubricant evaporates. So, every time the lubricant evaporates, and the polishing motion becomes harder to perform, add two drops of lubricant to the paste and go on with your polishing. |
|
Do not let the lubricant dry out while you are polishing your mirror, because you might damage the surface of the cloth pad with your polishing motions. However if you come to the end of a class period and have to stop polishing, it is O.K. to let the lubricant dry out overnight. Just stick a label on the edge of the glass, stating which of the two polishing compounds you're working with. Put the glass plate and cloth pad in a clean plastic bag, if you have one, and put it away in a protected place. Then, when you come back to work, take it out of the bag, add eight drops of fresh lubricant to the paste and start polishing again.
8 After about fifteen minutes of polishing, wash your mirror in running tap water and dry it off with a piece of lint-free lens tissue that is included with your kit. Do not use a paper or cloth towel to dry the partially polished mirror, because you will scratch it |
|
badly. Take a look at the surface of the mirror. You should now be able to see a blurry image of your own face in the mirror, because the surface is now beginning to become reflective. If you can still see lots of fairly prominent scratches in the surface of the mirror, add three drops of lubricant to the paste, and keep on polishing. Repeat this step until only very fine scratches or dimples are visible. When you are satisfied with the result, rinse your mirror in running water, |
| dry it off with a piece of lint-free lens tissue and set it aside, tilted stem down and face up, on a paper towel. Wash your hands with soap and water and dry them on a towel. Repeat steps 7 and 8 for your second and third Starshine Mirrors, using the same circle of Kempad polishing cloth and 3 micron diamond polishing paste that you used for your #1 mirror. Add a few drops of lubricant, as needed. When you're through, wash your second and third mirrors in running water and dry them with a lint-free lens tissue. Lay them aside on a clean towel, tilted face up. 9 Now that you've completed the first polishing step for all three of your mirrors, peel the Kempad polishing cloth off the glass backing plate. This is pretty hard to do, because the sticky stuff on the back of the pad is really strong. Find someone with good fingernails and strong fingers to do this job. Discard the dirty cloth pad into a wastebasket. Carefully wash the glass plate in running tap water, being sure to scrub away every bit of the sticky backing left over from the first pad of Kempad polishing cloth, and dry the glass plate with a paper towel. Wash your hands and dry them on a paper towel. |
|
10 Place the glass backing plate flat on a clean paper towel on your working surface. Peel the slick backing from your second circle of Kempad polishing cloth. Discard the slick backing into a wastebasket. Place the circle of Kempad polishing cloth very carefully on the glass, sticky side down, just like you did in Step 5, and smooth it down so there are no wrinkles in it.
11 Remove the ball cap from the syringe of blue 1 micron diamond polishing paste. Press |
|
gently on the plunger of the syringe and squeeze a blue "pea-sized" blob of the compound onto the middle of the circle of fresh Kempad polishing cloth. This 1-micron paste has smaller particles of industrial diamonds in it than does the 3-micron compound that you have already used. It will therefore produce a smoother final finish on your mirrors. Once again, be very careful not to press on the plunger too hard, because you might waste the compound. Use the dropper to suck eight drops of Hyprez Lubricant |
| from its bottle and dribble them onto the blob of diamond paste in the center of the |
|
polishing pad. Also, be careful not to let the tip of the dropper touch the blob of paste.
12 Place your #1 Starshine mirror face down on the blob of lubricated diamond paste in the center of the Kempad polishing cloth, just as you did in step 6. Polish the mirror for about twenty minutes, using a figure eight pattern and applying a very small amount of downward force. From time to time, use the edge of the mirror to work the paste back to the center of the polishing cloth. Every time the diamond |
|
| paste begins to dry out, and the polishing becomes harder to perform, add a few drops of lubricant and go on with your polishing. Do not let the paste dry out. |
|
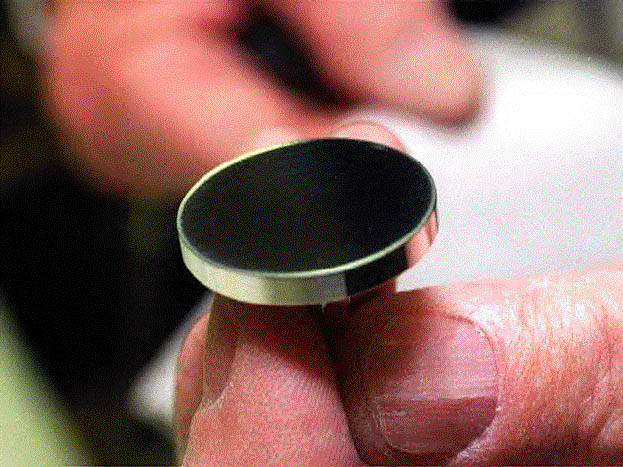
13 Wash the mirror in running tap water, wipe it dry very carefully with lint-free lens tissue and examine its surface. Do not touch the mirror's face with anything but the lens tissue, or you will scratch it in the process of examining it. Wash your hands with soap and water. You should now be able to see very clear reflected images in your mirror. Keep repeating step 12, using less and less downward force, until you cannot see any significant scratches or dimples in the surface of the mirror with your unaided eye. |
|
You'll never to able to get every tiny scratch polished away, of course, but please do the very best that you can, since the brightness of the sunlight reflecting from this mirror in orbit is dependent upon how well you do your job. When you are satisfied with the result, wash your mirror with running tap water, dry it very carefully with a piece of lint-free lens tissue and set it aside, tilted stem down and face up, on a piece of paper towel. Do not touch the mirror face with your fingers after this point; the oil from your skin will contaminate the polished aluminum. A piece of lens tissue and the face of your inspection flat are the only items that should touch the mirror face from now on.
Repeat steps 12 and 13 for your second and third Starshine Mirrors, using the same circle of Kempad polishing cloth and Hyprez 1 micron polishing compound as you used for your #1 mirror. You shouldn't need to add any more polishing compound, but you can, if necessary. Do not peel the circle of Kempad polishing cloth off the glass backing plate until after you have inspected all three mirrors in steps 14 and 15, described below, just in case you need to do some additional polishing.
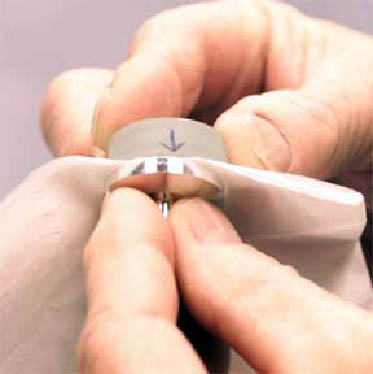
PHASE THREE - MIRROR FLATNESS TESTING14 Take the small glass optical inspection flat out of the slit in the foam insert in the mirror return box, wash it in running water, dry it with a piece of lint free lens tissue, and dry your hands with a paper towel. Pick up one of your polished Starshine mirrors and hold the mirror with its polished face up. Have a second member of your team lay a |
|
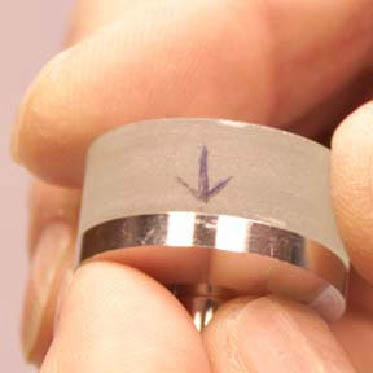
clean piece of lint-free lens tissue on the face of the mirror. Now the first person, the one holding the mirror, should grasp the optical flat by its frosted rim and place it down flat on top of the lens tissue. Make sure the arrow, which is marked on the side of the flat, is pointing downward toward the mirror surface. Then have the second person grasp the corner of the lens tissue and slowly pull it out from between the mirror and the optical flat, while the first person very gently presses the sandwich of mirror, tissue and optical flat together. Be sure to look at this procedure on the movie that came with your mirror kit, because this step and the following |
|
one are really hard to explain in writing. The purpose of this exercise is to get rid of dust particles. When your partner has pulled the lens tissue free, the optical flat will be resting on the face of the mirror. Be very careful not to skid the inspection flat around on your mirror, or its hard glass will scratch your aluminum mirror.
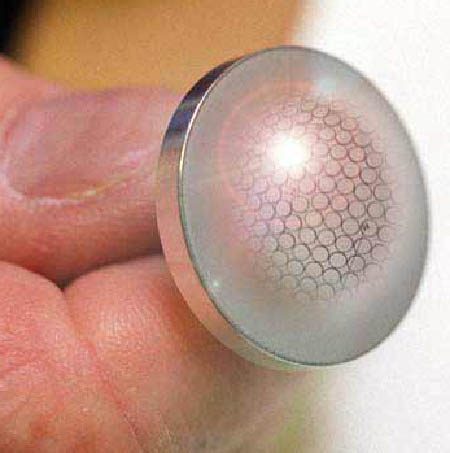
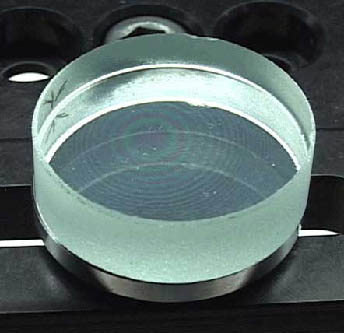
15 While gently holding the optical flat against the mirror's face, tilt the mirror and optical flat until you can see the reflected image of a fluorescent light in the mirror. Incandescent light or sunlight cannot be used; |
|
| the monochromatic Mercury line in fluorescent light is what we need for this test. |
| Move away from any outside windows, so sunlight doesn't interfere with the measurement. Now look for some very faint, colored, alternating light and dark, concentric interference fringes that will be superimposed on the reflected image of the |
|
fluorescent light bulb. They look like faint tree rings, or a bulls-eye, or the bands that you can sometimes see in oil floating on water.
It may take you several tries before you can make these rings out on your mirror, so be patient and persistent. When you finally see the interference fringe pattern, count the small, narrow, dark rings. The number of dark rings you can see, divided by two, will tell you, in wavelengths of visible light, how close to perfectly flat your mirror is. The interference pattern actually maps out the |
|
|
shape of the mirror's surface. The smaller the number of rings, the flatter the mirror is. If you can see fewer than 20 rings, then your mirror is flat within 10 wavelengths of visible light, and you have done your job well.
Keep working to get as few rings as you can, so your mirror will be sufficiently flat to reflect enough sunlight for you to see as the satellite flies overhead in the starry sky. If you just cannot get down to 20 rings, you might have to go back to step 2 and repeat the whole process, starting with the grinding step. We've included just enough extra materials in your kit for you to do this, if necessary, but there are none to waste. Perform inspection steps 14 and 15 for your second and third Starshine mirrors. If you get scratches on any of your mirrors during the flatness measurement step, go back and repeat steps 12 and 13 one last time to get rid of the scratches, and just eliminate steps 14 and 15, since you've already proven to yourselves that your mirror is properly flat. 16 When you have finished grinding, polishing and measuring the flatness of your three mirrors, place the best two of them back into the dark gray foam insert in which you received them, with the stems inserted into the holes in the foam. Also, place your inspection flat in the provided slit in that same piece of foam. Insert the foam rectangle into the self-addressed mirror return box and place a small piece of clean, lint-free lens tissue over the faces of the mirrors to protect their shiny surfaces. Close up the box and tape it securely shut. |
|
Put the correct postage on the box and mail it back to us at Starshine Headquarters. We'll take your best mirror to the Space Optics Manufacturing Technology Center at NASA's Marshall Space Flight Center for final cleaning, inspection, and the application of a protective silicon dioxide coating. Then, we'll take your coated mirror to the Naval Research Laboratory and mount it on the Starshine 4 satellite.
17 Be sure to have all the students and teachers at your school who worked on your mirrors print and sign their names on the sheet of lined paper that came with your kit. Label the sheet with the name and address of your school, together with your mirror number. Make extra copies of the page, if all your names won't fit on the single sheet. Fold the pages of names and slip them into the self-addressed return envelope, seal the envelope, put the proper postage on it, and mail it back to Project Starshine Headquarters. We'll scan your name sheets onto a CDROM and install it inside Starshine 4, so your names will circle the earth thousands of times, until the satellite descends into the denser regions of the atmosphere about eight months after launch and flames out like a meteor. You might want to place your third mirror in your school trophy case, together with photographs you have taken of each other working on your mirrors, as well as any newspaper articles or television videotapes that your teacher may have arranged about your participation in this phase of the Starshine 4 project. We hope you enjoy your participation in the Starshine 4/5 two-satellite mission. In addition to the Starshine 4 satellite on which your very best mirror will be installed, we'll be simultaneously flying an inflatable aluminized Mylar balloon called Starshine 5. By comparing the rates at which the orbits of the two satellites decay, we'll be able to make even more precise measurements of the density of Earth's upper atmosphere than we have been able to do previously. Thanks for the role you are playing in making this important experiment happen. Please ship your polished mirrors back to us by March 31, 2002. We're sorry to say that some schools don't bother to send their mirrors back to us at all. We'll use your second mirror to fill in for one of those schools, if necessary. We wish we could send a cloth patch of the official Starshine 4/5 logo to every person connected with the project, but this is an all-volunteer, un-funded effort, so we can't afford to do that. However, you can see a copy of the logo on our web site under the Starshine 4/5 Update, and you can find out how to purchase a cloth patch of it from Stephen Myers of Chapel Hill, NC by sending an email to svm@cisco.com.
If you have any questions about the project that aren't answered here or on the Starshine web site at http://www.azinet.com/starshine, please send an email message to Starshine Headquarters in Monument, Colorado, USA at gilmoore12@aol.com or call us at
A final note: If you notice any differences between the information on the video, which was made last year, and these printed instructions, which we've just recently revised, please accept the printed instructions as the final word.
 Page 1 Click for larger version
|